Oh, my Word! Tips on Word’s little mysteries.

also: Don’t forget our IT@IH 1.1 and IT@IH 1.2 courses!

Have you enjoyed watching Shawn’s Corner so far? Have you thought about how these segments wouldn’t be possible without computers?  To celebrate our love-hate relationship with computers, let’s take a gander at FORMAT PAINTER(it’s that little paintbrush) in Word.  Because you know how it is, you have a document looking like you want it and then you cut and paste something into the document—and then you have a mess, different fonts and sizes!  It’s not difficult to get everything all looking the same.

So today, four Word mysteries will be highlighted, solved and resolved.

This little paintbrush will make your cutting and pasting so much easier!
  1. As mentioned before, Format Painter, the little paintbrush.  The way you use this is quite like a paintbrush. So click on that paintbrush.  Then click on the formatting you LIKE.   Only after that should you click on the problem text. Funnily enough, it’s a bit counterintuitive, in that we like to tackle what’s wrong, but embrace the formatting you like and then go and touch up what you hate.  Try it a few times and you’ll like it!
.dotx files are master files you can use as a template
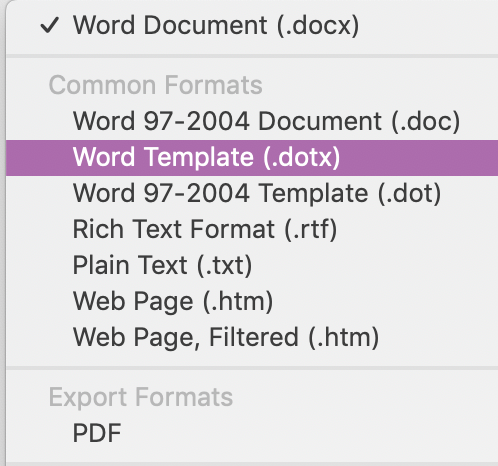
  • On the same topic of formatting, why not make all of your worksheets look similar—create your own persona, your own style and stick with it.  Believe me, doing this is not boring, it gives your class materials a “feel” to them.  So, take a look here at the template I created for our school using our logo, the font we use, the size & color of the title and the size & color of the text.  Once you have it all the way you want it, then go to file menu (where you save on PC) and scroll down to “Save as Template” or “Modelo” in Portuguese.  It’ll be saved!  It has an extension of .dotx  The next time you make some materials, open it!  The good thing is you can never erase the original because it creates a new file every time.
Tight or “justo”
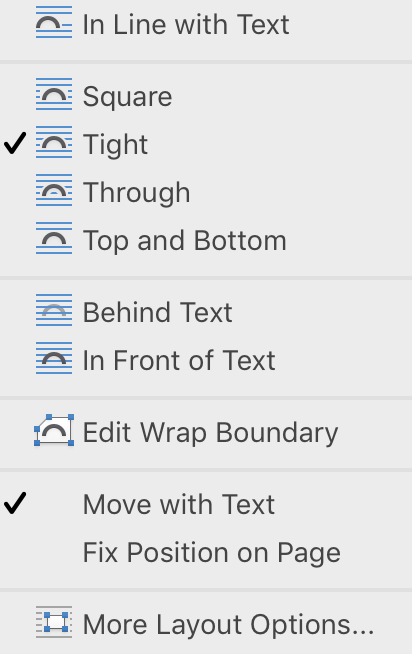
  • Like we talked about a few weeks ago, there is a way of keeping your pics stay where you want them in Word.  It’s called “Tight” or “Justo”.  The easiest way to find this is to double click on a picture OR right click on the picture and look for “Format picture” or, in more recent versions, you might only see a picture of a dog or a rainbow with lines around it.  Find the one where you can see there are lines all around.  This means that the text (and other pictures for that matter) will go around it.  For every version of Word out there, the process is essentially the same, but not exactly.  That’s why you’ll have to take a look on your computer, but if you get the idea of the concept, you shouldn’t have difficulty in finding how to get your text to wrap around the picture—and keep pictures from jumping around when you add more.
As long as you select the text you want to designate the language for, you can mix several languages in one document and use spellcheck!
  • Last but not least, let’s not forget spellcheck. And since we are language teachers, we have a trickier time of it. Most people get their computer formatted for their native language and that’s it, but in our case, even the same document might have two languages in it.  So, if you are like me and want to do that final check, first select all the text or the part that it’s in the language you are going to check. Or even before you start, which is better yet!  Then when you go to Review (or Tools on some computers), then you can do Spelling & Grammar check.

And there you have it, some quick tips on mysteries of Word. Most times in Shawn’s Corner, we have been focusing on how to make the most out of technology at home so that we can prepare for classes.  We’ll carry on with giving tips on technology and “paper” resources again in September.  For now, in the next few weeks, we hope to see you at our centre in Foz for our IT@IH 1.1 (beginner) and IT@IH 1.2 (intermediate) courses!

A focus on development from the “10 things to do in 2019”

Teacher Training is naturally focusing on the teacher and the best teaching practices.  But what about doing something for ourselves?  By this, I mean, just do something that makes you feel good about your English, your academic skills and your math skills? What, you say you’re an English teacher?

In one of our teacher training sessions, we looked at 10 things to do in 2019.  Well, we are halfway through the year and now it’s time to look at #6 and #8 of the top 10 things to do, both of which are related to teacher development.  We’ll look at a dictionary app for our phones as well as some games that are meant to hone our language skills.  Today, let’s kick off a summer of focusing on our own development and take away a few tools that any teacher will enjoy.

So the first one is the Merriam-Webster app for smartphones—both android and iPhone.  This is extremely useful for students and for you as a teacher.  You can always have a dictionary with you and it’s one of the best in the world.  Caution:  it isn’t a learners dictionary, but it gives almost all of the possibilities of how to use a word and examples.  It also gives etymology, which is really great because it’s possible to see where a word comes from.  The app, when you have internet, also pronounces the word.  This makes a wonderful tool for teachers and students.

Type merriam-webster.com/apps in your web browser, and go to the App Store or Google Play.  There is a fun game called Quizzitive, which I also have had lots of fun with.

The other app we looked at in 10 things to do in 2019, the one that I was talking about with the math, which actually you can avoid if you really want it, is an app called Elevate.  It is designed to increase how fast you think because it adjusts the level of difficulty as you use it. The developers describe it as “a brain training app designed to help you stay sharp, build confidence, and boost productivity.”  I look at it as a challenge and a fun thing to do to boost my vocabulary, grammar, listening and, yes, math skills.

Type elevateapp.com in your web browser, scroll to the bottom of the page and click on “Get it now”.

These two apps are free, they aren’t too big so they shouldn’t fill up your phone and they’ll help you sharpen up your skills.  At the same time, have some fun!

If you’d like to watch the video on Facebook, click here.

Flip ’em with Flipgrid in speaking exercises

Today we’re going to look at how to flip a speaking activity.  And why do this?  For one thing, it gives students more time.  They can speak at home without distraction.  And if they want to repeat again, they can.

Another good reason is that you can place your full attention on each students’ performance. It’s easier for you to take notes and think about suggestions.  OK, you can’t correct on the spot, but research shows correction on the spot isn’t as helpful as we’d like to think.

And, last but not least, you can’t be 2 places at once!  You can’t be maintaining discipline in one corner of the room and doing an individual speaking task in another.  And although I believe the idea that other students could benefit from listening to other, we know that this is often not the case.

So, let’s see how we can do this.  Let’s visit flipgrid.com

I already have an account made and signing up for that is quite easy.  You sign up your account, then create a new “grid”

Here is the Flipgrid for my Soar task.  Feel free to record your answers.  I have chosen to be “moderator” so your videos won’t be public until I have approved them.

Let’s take a look at how it works.  Basically, the task here is to look at the worksheet we made in previous Shawn’s Corner and to narrate it on an online platform.  Students narrate and the teacher can review the videos outside of classtime and give feedback using Flipgrid.  You’ll see some examples and also learn how to set up a Flipgrid speaking task.  You can put up videos, visuals and links for your students to look at.  They can give their response from the comfort of their homes.

If you’d like to watch the video on Facebook, click here.

IT@IH for T’s: goals and opportunities

By now, you have seen how we place importance in adding technology to enhance the classroom experience.  Technology can be used to access resources, create our own and also to challenge students during the class.  Let’s survey some of the skills you can work on this summer, especially if you take our IT@IH course.   Technology is not the centre of our teaching, but it certainly provides support!

This week let’s set some goals related to technology or at least see some opportunities that technology can provide us with if we use it well.  Technology should never be the centre point of our teaching, but it certainly can provide support!

I always tell people how I moved to Portugal with just a couple suitcases, which meant I didn’t bring any resources for teaching English along with me.  What I had, which has been a never-ending resource has been my laptop.  From there, I have been able to share a bit of the US with my students, or at least, English.  Just think of all of the videos on YouTube, and don’t forget the TED talks we talked about some weeks ago.  We’ve got the world at our fingertips, but we have to set some goals so we can take advantage of what technology can help us access.

That’s why the first goal is:  because you invest in creating activities to accompany video, why don’t you learn how to download the video?  Let’s download, create folders and organize our worksheets and videos so that they’ll be ready when we need them.  Also, let’s not leave ourselves at the mercy of a wi-fi connection at our school.

The second goal is:  take screenshots of videos.  And why not make PowerPoints & worksheets from our screen shots?  This summer, we’ll be working on making our own visually-rich activities using images from the internet, screenshots and perhaps even our own photos.

The third goal is:  calculating results.  Excel seems like a dirty word, but it’s a very powerful resource.  We just have to look at what we want to do and how to do it.  Working together, it’s really not as hard as it looks!

The fourth goal is: let’s explore a few online platforms like what we’ve seen here, such as Kahoot to challenge our students.  Several moments throughout the year doing activities and playing games using technology changes the pace and makes learning enjoyable.

By setting these goals, in fact we are creating opportunities for ourselves and our students.

If you’d like to watch the video on Facebook, click here.


Posts

Getting grammar and language out of picturebooks

Today we are going to work with a specific book, but I hope that you take a look at your library and find books with similar characteristics and that you try to make your own activities. 

Or, get a copy of Lost and Found and have the same experience I had with my students.  This book, in particular, works well with two language points — simple past and connectors.  Also, it helps students build emotional intelligence, or at least engage in a conversation requiring empathy.  You will find this especially interesting to do with students at the A2 and B1 levels.

So, let’s take a look at the cover.  And, if you’d like to take a look at a narrated version on YouTube, you can follow this link: www.youtube.com/watch?v=4V9I6ndRpoQ

Once we get inside, you’ll see that the verb forms are in the Past Simple and so it’s easy to practice that verb form. I have also worked conjunctions in the text (but, so, and) and time sequencers too.

So, let’s look inside at what I have done.  You  can do the same with another book or with this one.

I have cut out the phrases that would appear in the text and have replaced them with a letter.  Students have a table with all of the phrases cut out and with phrases where they have to supply the verb in the past simple.

Here’s the first picture of the text.  Which one is the matching sentence?

Further on, we see the boy talking to some birds.

And we see the boy starting out on his mission.

so the boy decided to help the penguin…

Notice the conjunction in this sentence—so.  Although I have taken out a lot of sentences out—17 in all, students are able to do this activity.   Later, they can do a matching exercise with pictures printed out.  Even better yet, they can re-narrate the story, given their own versions of each sentence.

There is so much you can do with picturebooks! This was one that worked really well in some of my classes. I hope it works well in yours.

Stories are fabulous, and even better if we can work with vocabulary and grammar. 

Next week, we’ll be here to work with something of more virtual appeal—we’ll look at some goals and opportunities for English teachers when using IT.

If you’d like to see this video on Facebook, click here.